Building AI Agents with Spring AI and Amazon Bedrock AgentCore – Part 3 Develop local MCP client for Conference application
Introduction
In part 2, we explained how to deploy and run our conference search application on the Amazon Bedrock AgentCore Runtime as the MCP server. In this article, we’ll develop the (MCP-) client, capable of talking to our application running on AgentCore Runtime.
Update from June, 2026. After I published this article, Spring AI 2.0 became generally available. At the bottom of this article, I’ll provide the required changes to make this example work with this version.
Develop local MCP client for Conference Application
Dependencies and Configuration
Let’s go step-by-step through it.
First, in pom.xml, we include, among others, those dependencies:
- spring-ai-bom – to include the general Spring AI functionality.
- spring-boot-starter-web – as we develop the MCP client as a web application.
- spring-ai-starter-model-bedrock-converse -as we use foundational models on Amazon Bedrock.
- spring-ai-starter-mcp-client-webflux – to develop an asynchronous Spring AI MCP Client. We can use spring-ai-starter-mcp-client to develop a synchronous one.
The SpringAIConferenceLocalMCPClient class is the main entry point to our application.
Second, in application.properties, we define some properties. Those are Spring AI-related:
We define the region where we host our application and the timeout when talking to the Amazon Bedrock models. Then we also set the default Amazon Bedrock model to use, a maximal number of tokens, and the MCP client type to ASYNC. We can also set SYNC instead, but we need to use another Spring AI MCP client dependency as described above.
We also include some application-related properties:
These are individual properties whose values we need to set from the deployment of the Conference search MCP server. We described the configuration, creation process, and those properties of the MCP server in part 2.
Please ignore other properties like amazon.bedrock.agentcore.gateway.url, as we will need them when we extend our application in the next articles.
Spring Rest Controller
The whole application logic is in the SpringAIAgentController class.
We inject the values of individual properties and build AWS service clients (STS and Cognito). This is how we create the ChatClient, which is the main interface of Spring AI to talk to the LLMs:
We show here that we can optionally build ToolCallingChatOptions and override the default model name and the maximum number of tokens defined in application.properties. Then, we build the ChatClient and can optionally set ToolCallingChatOptions.
Below is how the code for the method looks, which will receive the prompt from the user:
Let’s break this code down and explain it. First, we need to obtain the JWT token:
This, in turn, uses a bunch of Amazon Cognito services to achieve this goal:
Here, we use the configuration of the user (client ) names and the resource server ID from application.properties to obtain the user (client) pool. Then we construct the URL and the body (entity) of the HTTP request to obtain the authentication token. Then, we execute this request and obtain the token from the response:
After we have obtained the token, we’re ready to create the (asynchronous as configured) MCP client:
Let’s describe what happens when we invoke the getMcpClientTransport method:
We first construct the MCP_SERVER_ENDPOINT URL from the in application.properties configured AgentCore Runtime ID. In the next article, I’ll add the use case to also add the AgentCore Gateway URL. After that, we create the WebClientBuilder by passing some HTTP headers, including the bearer token. When we create WebClientStreamableHttpTransport and set the web client builder and the MCP server endpoint. It’s important to use the HTTP Streamable web client because AgentCore Runtime (and Gateway) only supports it.
Now we are ready to initialize our MCP client and obtain the list of tools from it:
We get all 4 tools that our Conference Search application from part 2 exposes, which we deployed on AgentCore Runtime.
Next, we need to create a list of tool callbacks from the MCP Client to pass to the ChatClient:
If you don’t need all the tools, you can filter them and, for example, only leave those tools whose name contains Conference_Search_Tool_By_Topic as a substring, as shown below:
Next, to enable search prompts such as “Please provide me with the list of conferences including their IDs, with Java topic happening in 2027, with call for papers open today”, we need to obtain the current date. LLM doesn’t know the current date, and for this, I wrote a small tool with the name DateTimeTools :
It contains only one tool to get the current date. Then, we pass this local tool to the ChatClient by invoking the tools method. We also pass the tool callback list from the AsyncMcpToolCallbackProvider by invoking the toolCallbacks method. The last step is to use the ChatClient with the given prompt and tool (callbacks) to produce an answer to the prompt. This answer will be streamed back to the user:
Build, deploy, and test the local Conference Application MCP client
Let’s build our application with: mvn clean package, and start it with: mvn spring-boot:run.
Now we can use CURL or HTTPie to send some prompts. For example:
“Please provide me with the list of conferences, including their IDs, with Java topics happening in 2027”.
Here is an example of the request with HTTPie:
http GET http://localhost:8080/conference?prompt=”Please provide me with the list of conferences, including their IDs, with Java topics happening in 2027″ Content-Type:text/plain.
Here is the correct LLM response:
As you can see from the description and logs, the LLM used the tool Conference_Search_Tool_By_Topic_And_Date from the MCP server to produce the answer. Let’s try another prompt:
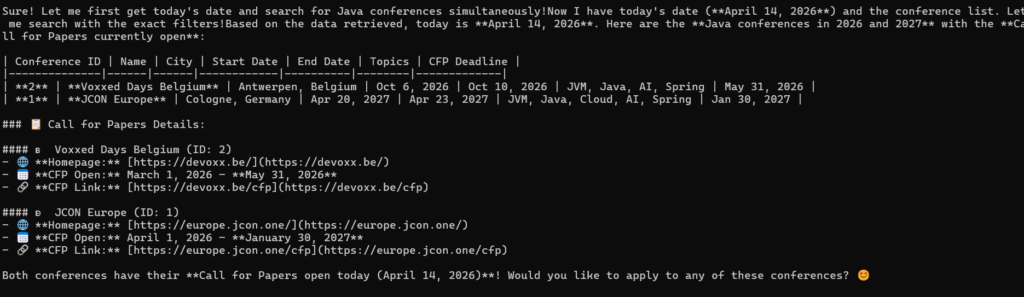
http GET http://localhost:8080/conference?prompt=”Please provide me with the list of conferences, including their IDs, with Java topics happening in 2026 and 2027, with the call for papers open today” Content-Type:text/plain
Here is the correct LLM response again:
As you can see from the description and logs, the LLM used the tools to produce the answer. Conference_Search_Tool_By_Topic_Date_CFP_Open from the MCP server and the local tool Get_The_Current _Date to produce the answer.
Conclusion
In this article, we developed the (MCP-) client, capable of talking to our application running on AgentCore Runtime. In the next article, we’ll look at another alternative to AgentCore Runtime to host MCP servers on AgentCore – AgentCore Gateway. We’ll also compare both alternatives. In one of the next articles, I’ll show you how to deploy and run this MCP client on the AgentCore Runtime as well, using the HTTP protocol. It’s not always appropriate to work with the client locally.
Update to Spring AI 2.0
After I published this article, Spring AI 2.0 became generally available. I also used the opportunity to update the example to use Spring Boot version 4.1. You can find the working example in my spring-ai-2.0-conference-app-agent-local.
I have noticed several major differences in the implementation of the MCP local client in the SpringAIAgentController controller.
The first one is that ChatClient now requires passing the ChatOptions.Builder object to the defaultOptions method instead of the ChatOptions object itself :
Next, the biggest difference is that instead of using WebClient from the Spring Webflux dependency, Spring AI 2.0 now uses HttpRequest.Builder from the java.net.http module to create an MCP HTTP Streamable transport. Also, the implementation of this protocol is now in the HttpClientStreamableHttpTransport class, which was adjusted to use java.net.http module. In Spring AI 1.*, the class name was WebClientStreamableHttpTransport:
Lastly, Spring AI 2.0 introduced some changes to how to use the MCP tools. This is how the code looked in the previous Spring AI 1.x versions:
The code in Spring AI 2.0 uses the tools method, capable of accepting the local tools as well as tool callbacks as its parameters:
Everything else remains the same.